PriscilaLeme

14 Best Outdoor Activities Near Las Vegas

Looking for exciting outdoor activities near Las Vegas, beyond the casinos and bustling nightlife? This vibrant city is surrounded by sprawling natural beauty, from red sandstone peaks at Red Rock Canyon to tranquil waters at Lake Mead.

In this post, Happiest Outdoors Contributor Shannon will guide you through the best outdoor adventures around Vegas. It includes thrilling hiking trails, serene water bodies, and adrenaline-fueled desert adventures. She is a Vegas local, so she knows all the best spots. Get ready to uncover a wilder side of Sin City!

This list of incredible outdoor adventures around Las Vegas includes:

This is a sensitive wilderness area. Learn how to Leave No Trace to keep the wilderness wild. Make sure you are prepared by bringing the 10 Essentials. Get ready for adventure with this checklist of things to do before every hike.

Hey there: Some of the links in this post are affiliate links, which means I earn a small commission at no cost to you. Thanks for your support. -Taryn

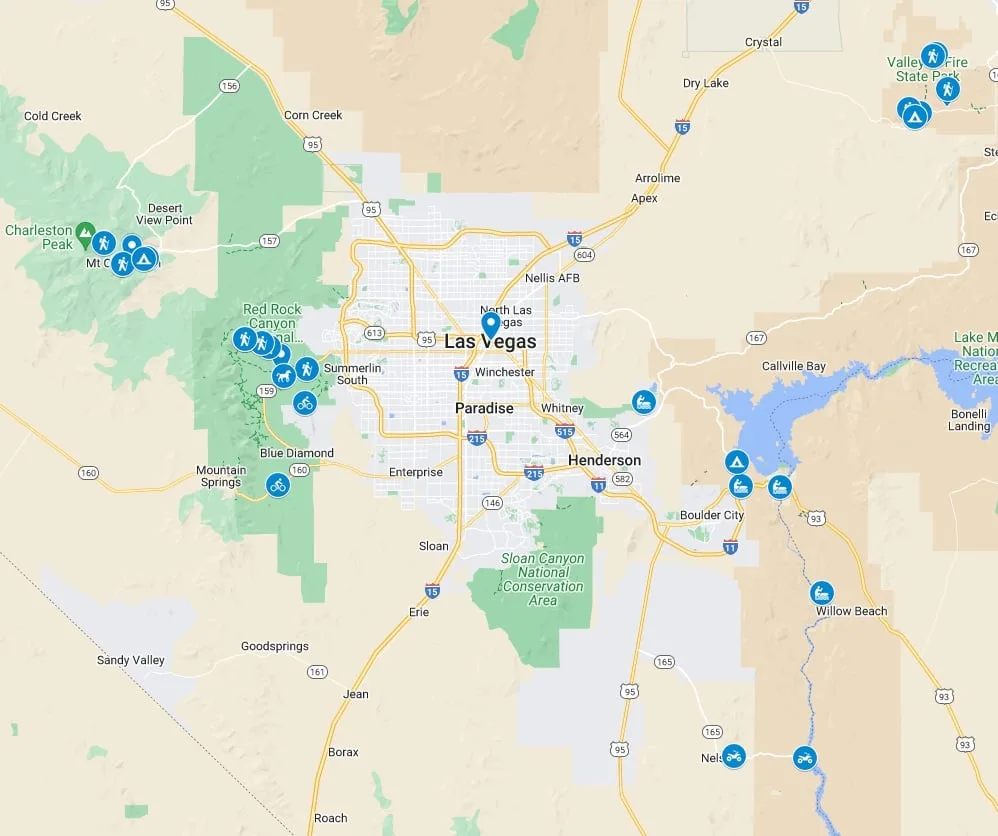
Las Vegas Outdoor Activities Map

If you’re staying in Las Vegas, you’re probably wondering how far out of town you will need to go to get to outdoor adventures spots. We made a custom Las Vegas Outdoor Activities Google Map just for you that shows you all the places Shannon recommends in this post.

For some of these activities you can arrange transportation with a tour company, but for others, you’ll need to drive yourself. I like to use Discover Cars to book rental cars since it lets me compare prices across tons of companies.

Map of outdoor activities near Las Vegas
Click on the map to zoom in!

Hiking and Nature Trails Near Las Vegas

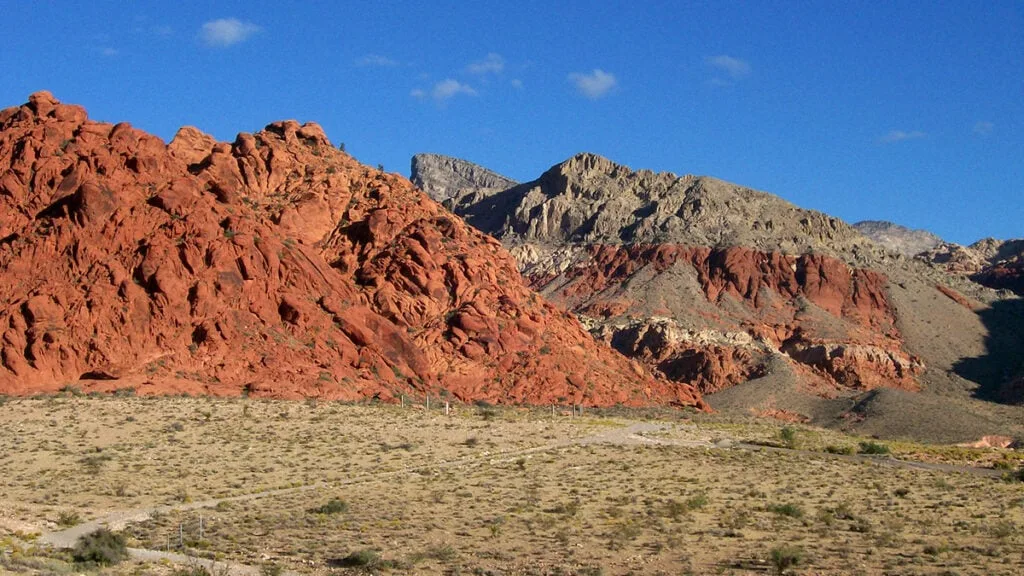
Hiking at Red Rock Canyon National Conservation Area

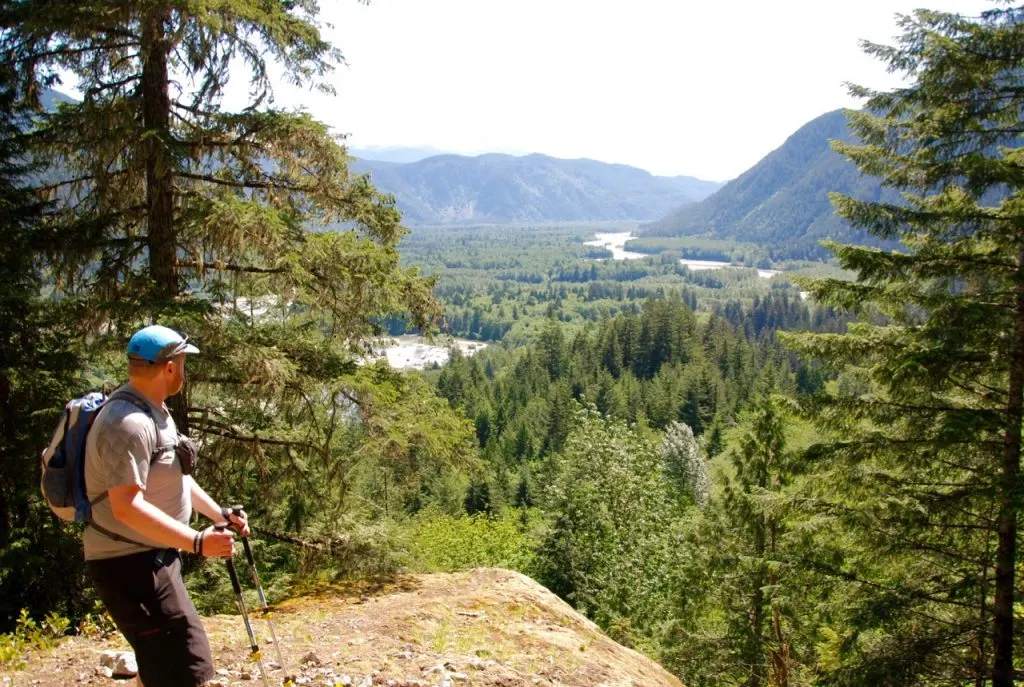
Red Rock Canyon National Conservation Area offers a breathtaking landscape for avid hikers. This area, located just 30 minutes from Las Vegas, hosts some of the best hiking trails near the city. Once you enter the park, you’ll find a one-way 13-mile scenic drive that leads you to many of the trailheads for hiking and exploring. The trails range in difficulty so it’s easy to pick one suited to your fitness level or desired challenge.

For first-time visitors, swing by the Visitor Center. The friendly staff provide information about various recreation opportunities tailored specifically for outdoor enthusiasts like you! 

Rock formations at Red Rock Canyon National Conservation Area, one of the best outdoor activities near Las Vegas
Photo: Shannon/Three Days in Vegas

Here’s a quick rundown of some of the more popular trails:

The White Rock Mountain Loop is a strenuous trail that stands out with its different scenery, cooler temperatures, and tranquil picnic spots under pine trees.

Moenkopi Loop is a popular pick. It offers varied terrain and stunning desert vistas on an easy trail.

Calico Hills Trail gives hikers up-close views of brightly colored sandstone formations and hidden slot canyons.

The Calico Tanks Trail includes a hidden water tank at the finish line – a true oasis in the desert. Explore further along this strenuous trail for amazing views of the Las Vegas Strip.

Hiking to Turtlehead Peak gets your heart pumping while rewarding you with panoramic views of Las Vegas.

Keystone Thrust Trail brings geology to life as it passes through an exposed fault line.

Where to Go Snowshoeing in Squamish

Squamish is one of the best small towns in Canada for outdoor adventures. So it’s no surprise that the outdoorsy fun continues in the winter… in the form of snowshoeing.  The terrain around Squamish is pretty rugged, but there are still a few great places go snowshoeing in Squamish.

In this guide to snowshoeing in Squamish, you’ll get info and directions for 9 different trails ranging from super flat beginner trails to all-day epics to deep backcountry wilderness. I live in Squamish so I’ve got the inside scoop on the best places to snowshoe in Squamish.

This guide to snowshoeing in Squamish includes:

Psst! Looking for Squamish activities? Check out my huge list of things to do in Squamish – it includes over 70 ideas!

Looking for other places to snowshoe in BC? Check out these posts about Vancouver-area snowshoe trails:

Hey there: Some of the links in this post are affiliate links, which means I earn a small commission at no cost to you. Thanks for your support. -Taryn

Snowshoeing in Squamish Quick Reference Guide

TrailRatingTime NeededCost
Panorama TrailSuper Easy45min-1 hour$65.95-72.95
Wonderland Lake LoopSuper Easy30min-1 hour$65.95-72.95
Shannon Basin LoopModerate3-4 hours$65.95-72.95
Al’s Habrich RidgeModerate2-2.5 hours$65.95-72.95
Sky Pilot ValleyModerate3-4 hours$65.95-72.95
Skyline Ridge TrailChallenging8-10 hours$65.95-72.95
Red Heather/ Elfin LakesModerate/ Challenging4 hours- overnightFREE/$16-$21
Garibaldi Lake/Taylor MeadowsChallenging7 hours- overnightFREE/$16
Brandywine FallsSuper easy/Moderate30 min- 2 hoursFREE

But First… Be Prepared

  • Make a trip plan: While these trails may be steps from busy ski areas, they access serious wilderness. Tell someone where you are going and when you expect to be back. Use the great trip planning tools from Adventure Smart.
  • Check the weather, trail conditions, and avalanche forecast: If the weather and trail conditions don’t look good, don’t go. Use my list of the best weather apps for hiking. Check the avalanche forecast. Unless you have taken an avalanche safety course, you probably shouldn’t go out unless the forecast is rated “Low”. 
  • Wear winter clothing and pack the essentials: Prepare for emergencies by packing the 10 essentials. Read my recommendations for what to wear snowshoeing and tips for winter hiking and snowshoeing.
  • Use safe snowshoeing techniques: Snowshoes keep you from sinking into deep snow, but they aren’t great for walking sideways or downhill – it’s easy to slip and injure yourself. Read up on snowshoeing safety and check out my guide to choosing snowshoes.) They also have crampons and other traction aids underfoot to help grip icy snow.
  • Take an avalanche safety course: If you plan to stray from flat terrain, you need avalanche safety training. Avvy Savvy is a great FREE online beginner tutorial on Avalanche.ca. You should also take a 2.5 day AST1 course with avalanche Canada.

Where to Rent Snowshoes in Squamish

If you’re looking for advice on how to choose snowshoes, I’ve got a snowshoe buying guide for you. I wear MSR snowshoes which are better for steep and icy trails.

If you want to try snowshoeing before you buy, a few places Squamish rent snowshoes. Sunny weekends and holidays can be really busy for rentals, so try to reserve a pair ahead of time if possible.

Snowshoe Tours in Squamish

If it’s your first time snowshoeing, it can be helpful to go with a guide. They can help you get your snowshoes set up and provide tips for snowshoeing technique. Your guide will also have info about the plants, animals and views you will see on your trip.

https://d848f367a1855eb5860290c4e9539c58.safeframe.googlesyndication.com/safeframe/1-0-40/html/container.html

Snowshoeing at the Sea to Sky Gondola

Permits/Fees: Day tickets for the gondola are $69.95 on weekdays and $72.95 on weekends. However, you can save a few dollars if you buy your ticket online in advance. Once you get to the top there are no additional charges for snowshoeing.

If you want to avoid paying for the gondola up, you can hike up the Sea to Summit Trail instead, carrying your snowshoes. (You can take the gondola down for only $20.)

However, in the winter the Sea to Summit Trail sometimes closes due to hazardous conditions and if it’s open, it can be icy and dangerous so you will need crampons and an ice axe. For more information on the Sea to Summit trail including trail closures and conditions, see the Sea to Sky Gondola website.

Dogs: Not permitted on the gondola so if you want to snowshoe with your dog you’ll have to hike up the Sea to Summit Trail first. Dogs are only permitted on the Al’s Habrich Ridge, Sky Pilot Valley and Skyline Trail and they must be on leash.

Driving Directions: Drive 50 min from Vancouver to Sea to Sky Gondola parking lot. If you’re coming from Squamish, it’s a 10-minute drive south of downtown. Note that BC law requires you to have winter tires to drive on highway 99 between October and April.

Parking: Free in the Sea to Sky gondola lot.

Transit Access: The Sea to Sky Gondola runs a shuttle service from Vancouver each day. It’s $105 for a combo shuttle and gondola pass, which isn’t a bad deal. Be sure to keep the shuttle schedule in mind when planning which trail to tackle.

Hike to Crooked Falls in Squamish

When you think of waterfalls in Squamish, you think of Shannon Falls or maybe Brandywine Falls. Those are both amazingly tall waterfalls with easy tourist-in-flipflops-friendly walks to a viewing platform, overflowing parking lots and tons of people with selfie sticks.. But what if I told you there were other awesome waterfalls in Squamish that you could actually hike to, then have them all to yourself? Welcome to Crooked Falls in Squamish!

This waterfall is interesting because… well it’s crooked, like the name. In cascades down the Sigurd Creek directly into a rock bluff, where it makes a sharp 90 degree turn before flowing downhill.  And you get to stand on the rock bluff! (I shot the video from there.) It’s a bit of a drive to get there, but the hike isn’t too difficult and the views are certainly worth it.

Driving Directions to Crooked Falls

Click for full driving directions from Vancouver . (But if you do use these directions, be aware that you will lose cell service outside Squamish so you’ll need an off-line version of the map).

Drive highway 99 to Squamish. North of Squamish turn west (left) on to Squamish Valley road – this is the same intersection as the entrance to Alice Lake Provincial Park, but you want the road on the other side of the highway.  Follow this road to a bridge over the Cheakamus River. Immediately after the bridge the road forks – go left to stay on the Squamish Valley road. The road has speed bumps as it passes through the Cheakamus Indian Reserve. Follow this road for about 19km past some homes and ranches to the end of the pavement.

Past here you will be on the Squamish Forest Service Road, which is gravel and can be dusty, but any 2WD drive car can make it to the trailhead. About 1km after the road turns to gravel, watch for a big bridge on your left – it may be signed Ashlu Main Forest Service Road or Squamish Riverside Campground. Turn left to cross the big bridge, go past the campground (on your right), then cross another smaller bridge. Stay on the main Ashlu road for another 2km or so, then cross two smaller bridges over the Ashlu river. Right after the second bridge, park your car. The overgrown logging road heading uphill on the lefthand side of the road is the trailhead (and it has a sign that says Sigurd Trail).

Sigurd Creek Trailhead - Crooked Falls
Sigurd Creek Trailhead

Crooked Falls Hike

Distance: 7km round trip

Elevation gain: About 400m

Hikeable all year round since maximum elevation is around 500m so you are unlikely to encounter snow in the winter.  Best in the spring if you want to see the falls at maximum flow.

The BCMC (British Columbia Mountaineering Club) built and maintains the trail as it accesses some mountaineering and scrambling objectives higher up the mountain. The trail is well-built and well marked with orange squares so it is easy to follow. From the trailhead where you parked your car walk about 15 minutes uphill on the old road. At a switchback where the road curves right, look for a trail heading left with a “Sigurd Trail” sign.

Sigurd Trail sign - Crooked Falls
Sign marking the left turn off the old road

At this point you are on a narrow trail that sometimes widens up enough for you to tell that you are on another, even older road. You’ll pass below a huge rock wall covered in dripping moss and get glimpses of the Squamish valley through the trees. After a few hundred meters you’ll pass another trail sign indicating that the trail heads sharply up the hill.

Sigurd Creek Trail - Crooked Falls
Trail sign points uphill – the climbing starts here

The trail climbs steeply uphill for a few minutes before popping out on a rocky bluff with a great view of the Squamish River valley.

Squamish River Valley from the hike to Crooked Falls
The view of the Squamish River Valley

Past the viewpoint the trail climbs steeply with a few breaks and passes lots of mossy rock walls, a giant boulder and a few patches of more mellow forest.

Hike the Skyline Trail in Jasper National Park

The Skyline Trail is one of the most popular backpacking trips in Jasper National Park. And it’s easy to see why – it’s 44 km of spectacular mountain scenery including 25 km above the treeline. I hiked the trail over 3 days in late August and was amazed by its beauty.

I’m a hiking guidebook author and have backpacked all over BC and the Canadian Rockies. So far the Skyline Trail is tied with the Rockwall Trail as one the most spectacular multi-day mountain backpacking trip I’ve done.

My guide to the Skyline Trail in Jasper National Park includes:

This is a sensitive wilderness area. Learn how to Leave No Trace to keep the wilderness wild. Make sure you are prepared by bringing the 10 Essentials. Get ready for adventure with this checklist of things to do before every hike.

Hey there: Some of the links in this post are affiliate links, which means I earn a small commission at no cost to you. Thanks for your support. -Taryn

Skyline Trail Quick Facts

Description: The Skyline Trail is a spectacular hike through the mountains in Jasper National Park. Most of the hike is above the treeline and you cross three mountain passes. There are six backcountry campgrounds and one backcountry lodge along the route.

Location: The Skyline Trail is located in the Rocky Mountains in Canada’s Jasper National Park. The trail runs thought the mountains from Maligne Lake to Signal Mountain Trailhead on Maligne Lake Road near Maligne Canyon.

Distance: 44 km one-way

Elevation Gain: 800-1330m depending on which direction you hike

Difficulty: Moderate. There is one steep and challenging section but the rest of the trail is quite mellow.

How long does it take to hike the Skyline Trail? 2-4 days. Most people will take 3 days. See the itinerary section for more info.

Best time to hike the Skyline Trail: Mid-July to mid-September. The trail is too snowy the rest of the time.

Skyline Trail Weather: The Skyline Trail is the highest trail in Jasper National Park. Most of the trail is above 2000m. In July and August, the average high temperature is 22°C and the average low is 7°C. Thunderstorms in the afternoon are common. Use my picks for the Best Weather Apps for Hiking to see the forecast for your trip.

Skyline Trail Reservations and Costs: You must make reservations to hike the Skyline. It costs about $110.50 per person to hike the trail (including National Park entry fees, backcountry camping fees, a reservation fee, and a shuttle fee). But you can save money by going in a group, hiking faster, or driving yourself. More details are in the reservations and costs sections below.

What to Bring on the Skyline Trail: This is a remote hiking trip, so you will need to bring typical backpacking gear. Use my backpacking checklist to make sure you have everything you need.

Wildlife on the Skyline Trail: The trail is in bear country (both black bears and grizzly bears). Carry bear spray, hike in a group, and make noise, especially in brushy areas. Use campground cooking areas and store all your food in toiletries in bear lockers. Read my bear safety tips for backpackers for more info.

Skyline Trail Rules: Dogs, fires, drones and hammocks are not allowed.

Indigenous Context: The Skyline Trail is in the traditional territory of the Anishinabe, Aseniwuche Winewak, Dene-zaa, Nêhiyawak, Secwépemc, Stoney Nakoda, Mountain Métis and Métis. The government forced Indigenous people to leave when Jasper National Park was created in 1907 and prohibited from accessing their traditional territory to hunt, fish, gather, and conduct cultural practices.

How to Hike and Camp at Toleak Point in Olympic National Park

If you’re looking to explore some of Olympic National Park’s rugged coastline, I recommend hiking to Toleak Point from Third Beach. It’s a moderately challenging trail that travels along beaches and across steep headlands. The area around Toleak Point is dotted with dozens of offshore islands and sea stacks, making it really picturesque. Plus there are ah-mazing sunsets! You can hike there and back in a full day, but I think you should make it a backpacking trip and stay the night. The Toleak Point area isn’t as popular as the easier Ozette Loop or Shi Shi Beach hikes, which means you’ll experience more solitude.

However, you will have to work a bit harder for that solitude by climbing up ropes and carefully planning for the tides. I’ve done quite a few trips to the Olympic Coast so far, and I think Toleak might just be my favourite. There’s enough challenging terrain to make it a bit of an adventure, without it being too hard to be enjoyable. And the scenery… oh the scenery. If you are planning your own hiking or camping trip to Toleak Point, I’ve got all the info you need to make your trip incredible.

Hey there: Some of the links in this post are affiliate links, which means I earn a small commission at no extra cost to you if you make a purchase. Thanks for supporting my website! -Taryn

Third Beach to Toleak Point Hike Basics

Map of the hike from Third Beach to Toleak Point in Olympic National Park.
You’ll hike from the Third Beach trailhead to Toleak Point.

Pronunciation: It’s “toe-lee-ack”. If you say “too-leek” the Rangers will giggle.

Third Beach to Toleak Point Hike Basics

Map of the hike from Third Beach to Toleak Point in Olympic National Park.
You’ll hike from the Third Beach trailhead to Toleak Point.

Pronunciation: It’s “toe-lee-ack”. If you say “too-leek” the Rangers will giggle.Indigenous Land: This route is on the traditional territories of the Quileute and Hob people’s. Toleak means “hole in the rock” in the Quileute language and is likely a reference to the large window in the sea stack just north of Toleak Point.

Distance: 6.5 miles (10.5km) one way

Difficulty: Moderate. There are some challenging ladders and rope-assisted bluffs to climb.

Time: Depends on the tides. One overnight or at least 3.5 hours each way.

What to Bring: Everything you need to be self-sufficient. Use my simple backpacking checklist to ensure you have the gear you need.

Permits: Olympic National Park pass required. Overnight visitors require a camping permit.

Tide Info: La Push Tide Table. You will want to look into the tides when planning your trip as they can make a BIG difference.

Sunset at Toleak Point in Olympic National Park

Toleak Point is on the coast in Olympic National Park. It’s actually part way along the South Coast Wilderness Trail, which is a longer and more difficult route from La Push in the north to Oil City in the south. The scenery on the northern section up to Toleak Point is just SO good. I think it’s worth heading into Toleak Point for a day trip or an overnight backpacking trip.

Toleak Point is on the coast in Olympic National Park. It’s actually part way along the South Coast Wilderness Trail, which is a longer and more difficult route from La Push in the north to Oil City in the south. The scenery on the northern section up to Toleak Point is just SO good. I think it’s worth heading into Toleak Point for a day trip or an overnight backpacking trip.